MFHデカールの貼り方/デカール保管上の注意点 How to apply MFH decals / Regarding storage of decals from MFH kits
[ 弊社デカール保管上の注意点 Regarding storage of decals from MFH kits ]
■弊社のデカールを保管する際、複数のデカールの印刷面同士を保護紙無しで直接重ねること、またデカールの印刷面と別のデカールの裏面とを直接触れて重ねる保存は避けてください。
■また、弊社のデカール保護紙を挟んだ状態であっても、重いものをのせたりして圧力をかけて保存するのは避けてください。
■また、極端に湿度が高い環境での保存も避けてください。
■弊社のデカールは柔軟性を持たせるため、印刷面がデリケートです。上記のような保存を行うと、印刷面がダメージを受ける場合があります。
■デカール保護紙をはがした際、表面に保護紙と接触していたことによる微細な跡(ツヤの変化)が残る場合があります。この跡は、多くの場合、水に浸けてモデルに貼った後は、あまり目立たなくなります。クリアコートをした場合は、ほぼ見えなくなります。
– when storing decals, please refrain from stacking decals together/on top of each other without placing protective paper in between decal sheets.
– refrain from applying weight/pressure or sandwiching decals between objects when storing decals.
– refrain from leaving decals in high moisture areas while storing.
The decals used in our kits have a delicate finish in order to preserve flexibility. The surface layer may become damaged over time if the above steps are not followed.
When removing protective paper, sometimes traces will remain on the clear coat surface. In most cases, the trace will stand out less after soaking the decals in water and applying them to the model. If the model receives a clear coat after decals have been placed, the traces will become almost invisible.
[ MFHデカールの貼り方 How to apply MFH decals ]
■動画の補足説明です。
1)デカールを台紙から分離させるとき、水ではなく、90~100度の熱湯を使います。熱湯を使うことによって、デカールが柔らかくなり、破れにくくなります。
2)デカール軟化剤は、市販品がありますが、メーカーによって性質がかなり異なります。ですので、弊社デカールには、アルコールを使用する場合があります。
アルコールは、市販品の燃料用アルコールです。だだし、燃料用アルコールといってもメーカーによってメタノールの濃度、配合成分に違いがある為、必ず不必要なデカールでテストをしてください。強すぎる成分の場合や、強く擦ったりした場合だとデカールや、下地塗料が溶け出す可能性もあります。
3)アルコールを筆で塗布する時、少しづつデカールが軟化していきますので、根気よく時間をかけて馴染ませます。
4)ある程度馴染ませたら、2~3分放置、アルコール分が蒸発して、ふやけ気味のデカールが縮んでシワが目立たなくなっていきます。
5)最後にぬるめのお湯を少し含ませた奇麗な布でデカール面を押さえて、表面を整えます。
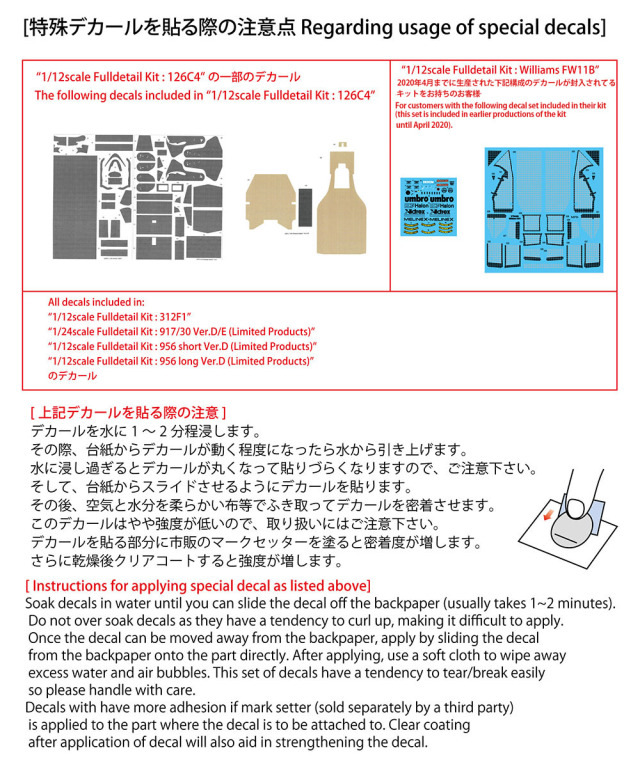
■なお、
“1/12scale Fulldetail Kit : Williams FW11B” *(2020年4月までに生産されたキットに同梱されているデカール)
“1/12scale Fulldetail Kit : 126C4”
の一部デカール、
“1/12scale Fulldetail Kit : 312F1”
“1/24scale Fulldetail Kit : 917/30 Ver.D/E (Limited Products)”
“1/12scale Fulldetail Kit : 956 short Ver.D (Limited Products)”
“1/12scale Fulldetail Kit : 956 long Ver.D (Limited Products)”
"P1137 : 1/12scale LINE DECAL for 787B"
のデカールは、
上記方法での貼り方は使えません。
こちらの特殊デカールを貼る際の注意点は、画像に記してありますので、そちらを参照願います。
Extra tips:
1) use boiling water (90~100 degrees Celsius) to remove decal from backing sheet. Not only will this soften decals, it will also make it harder for decals to break.
2) various decal softeners exists on the market for removing wrinkles from decals but vary in strength depending on the maker. In the video we used fuel alcohol (alcohol used as lamp fuel with a mixture of 95% methanol and 5% ethanol) – please note that various alcohol products exist on the market and differ vastly in concentration and dilution. Please test with unneeded decals first to see if the alcohol works with the decals – if too strong the alcohol will burn through the decals. Note that it is not absolutely necessary to use alcohol unless decals are not settling well, or if a 3rd party decal softeners is not functioning well – please try out various market products and find one that suits you best.
3) apply alcohol lightly onto the decal using a brush and the decal will slowly soften. It make take some time for results to show.
4) after brushing down the decal fully, leave decals alone for 2~3 minutes. Decals will shrink as alcohol is evaporated and remove wrinkles from the decal at the same time.
5) use a clean cloth soaked in a bit of warm water and adjust decal as needed. Use light pressure.
In addition:
For CERTAIN decals included in kit:
“1/12scale Fulldetail Kit : Williams FW11B” *(earliar productions of the kit until April 2020)
“1/12scale Fulldetail Kit : 126C4”
For ALL decals included in kit:
“1/12scale Fulldetail Kit : 312F1”
“1/24scale Fulldetail Kit : 917/30 Ver.D/E (Limited Products)”
“1/12scale Fulldetail Kit : 956 short Ver.D (Limited Products)”
“1/12scale Fulldetail Kit : 956 long Ver.D (Limited Products)”
and
“P1137 : 1/12scale LINE DECAL for 787B”
the decal(s) included in the kits mentioned require different handling and applying methods. Please refer to the images attached for specifics instructions.


